Here's a great little sewing project for the weekend! This project is really quick and you can utilise those scraps of fabric that you have hanging around. I hate wasting any fabric and so love sewing projects which make good use of left overs.
I based my card holder on a free pattern available from "A Spoon Full of Sugar's" Fantastic Blog over at: http://www.aspoonfulofsugardesigns.com/ Direct Link to the Pattern is here: https://sites.google.com/site/aspoonfullofsugargirls/aspoonfulofsugar
I changed the pattern slightly as I had some denim that I wanted to use and so replaced the piece made up of scraps with one complete piece of denim - I also didn't use interfacing as I felt that the denim was thick enough as it was.
To make the denim more interesting, I added some embroidery by drawing my own emblem and then used back stitch to outline the motif with satin stitch on the wing.
One of my favourite parts of the design is the closure, made from a hair band and a button!
Inside of card holder - I wish I had lowered the top card holder slightly as it ended up a little too close to the edge, but my cards still fit in fine.
This is a great project which takes no time at all - the designs from "A Spoon Full of Sugar" are very inspiring and another great Free Pattern!
Sewing Projects To Inspire
Love sewing and wish to inspire others to sew for themselves and create fabulous projects
Thursday, 15 August 2013
Wednesday, 7 August 2013
Joining Fabrics Strips Together + Making Bias Tape
Here is a tutorial that I've prepared on joining fabric strips together. Now I know that to some of you that this is a technique that you have fully nailed! But please remember the idea to my blog is to inspire others to sew and so my tips are be aimed at beginners - trying to cover off all of those things that I had to search for when I was learning to sew myself!
Joining fabric strips together is useful when creating bag handles and making your own bias tape - which I am now addicted to making!
You only need to join fabric strips cut on the bias if you are making bias binding for going around curves i.e. arm holes and necklines on garments. Otherwise, just cut strips from fabrics out in the usual fashion.
If cutting on the bias, the easiest way to do this is to start with a square of fabric...
.... and fold your fabric at a 45 degree angle as shown below
(if not cutting on the bias - skip this step - go ahead and cut your fabric strips out as required). Iron the crease - this then provides you with a guide to mark your fabric for cutting on the bias.
Cut along the ironed crease line so that you end up with two triangular shaped pieces of fabric.
Using the cut line as your guide, measure your required fabric strip or bias tape width (I am making a thin bias tape and so I measured 2" for my fabric strip). I find using a set square helpful when drawing lines for cutting out. Make as many strips as required if making bias tape.
When you have the amount of fabric strips that you require (either cut on the bias or not) lie them as shown below, at a 90 degree angle. Allow an overlap of a couple of mm's. You will see that the top fabric strip here is pattern side down and that the bottom fabric strip here is pattern side up.
Mark a sewing line at a 45 degree angle on the top fabric strip from the top left hand corner to the bottom right hand corner.
Sew along the guide line and then trim off the corner to reduce bulk.
Iron open the seam as follows...
If making bias tape, repeat above steps until you have a long enough piece of fabric for your required bias tape, and then feed through a bias tape maker. Pin the edge of the bias tape and then iron as your bias tape is fed through the bias tape maker. When you have ironed the entire length, fold the tape in half lengthways and iron again.
Ta-da! You then have your very own bias tape for your sewing projects!
Joining fabric strips together is useful when creating bag handles and making your own bias tape - which I am now addicted to making!
You only need to join fabric strips cut on the bias if you are making bias binding for going around curves i.e. arm holes and necklines on garments. Otherwise, just cut strips from fabrics out in the usual fashion.
If cutting on the bias, the easiest way to do this is to start with a square of fabric...
.... and fold your fabric at a 45 degree angle as shown below
(if not cutting on the bias - skip this step - go ahead and cut your fabric strips out as required). Iron the crease - this then provides you with a guide to mark your fabric for cutting on the bias.
Cut along the ironed crease line so that you end up with two triangular shaped pieces of fabric.
Using the cut line as your guide, measure your required fabric strip or bias tape width (I am making a thin bias tape and so I measured 2" for my fabric strip). I find using a set square helpful when drawing lines for cutting out. Make as many strips as required if making bias tape.
Straighten off the fabric strip edges.
When you have the amount of fabric strips that you require (either cut on the bias or not) lie them as shown below, at a 90 degree angle. Allow an overlap of a couple of mm's. You will see that the top fabric strip here is pattern side down and that the bottom fabric strip here is pattern side up.
Mark a sewing line at a 45 degree angle on the top fabric strip from the top left hand corner to the bottom right hand corner.
Sew along the guide line and then trim off the corner to reduce bulk.
Iron open the seam as follows...
Your fabric strip is then joined!
If making bias tape, repeat above steps until you have a long enough piece of fabric for your required bias tape, and then feed through a bias tape maker. Pin the edge of the bias tape and then iron as your bias tape is fed through the bias tape maker. When you have ironed the entire length, fold the tape in half lengthways and iron again.
Ta-da! You then have your very own bias tape for your sewing projects!
Thursday, 1 August 2013
What Are Fat Quarters?
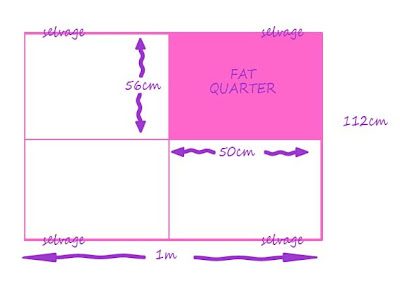
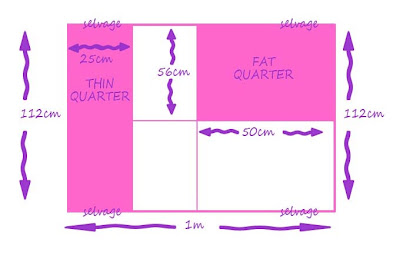
A fat quarter is a piece of fabric which usually measures 56cm wide x 50cm long (22"x 20"). In the US Fat Quarters usually measure at 56cm wide x 46cm long (22" x 18").
The "quarter" part comes from the fabric being a quarter of a meter of cut fabric or a quarter of a yard of cut fabric in the US.
The "fat" part comes from the surface area being a "wide" cut rather than "thin" cut.
Ultimately fat quarters can be purchased in a large array of beautiful fabrics for crafting projects and can often be obtained in bundles at good prices on sites such as Ebay etc. Giving you affordable access to what may otherwise be expensive fabrics if bought by the meter (or yard).
The added bonus is that there are oodles of sewing projects that can be created using fat quarters!
The "quarter" part comes from the fabric being a quarter of a meter of cut fabric or a quarter of a yard of cut fabric in the US.
The "fat" part comes from the surface area being a "wide" cut rather than "thin" cut.
The added bonus is that there are oodles of sewing projects that can be created using fat quarters!
Wednesday, 31 July 2013
Free "Poochie Bag" Pattern
One of my first sewing projects was to create this beautiful "Poochie Bag" with a free pattern supplied by Monica Solorio-Snow over at Happy Zombie.
The pattern is great as it's designed to be created from just three fat quarters, although the pattern assumes knowledge of sewing, it is suitable for a beginner and a great project to undertake.
This is my creation using the pattern - I choose three vintage fabrics to create mine and use it for my lunch bag - I absolutely love it - why not have a go yourself?
Tuesday, 30 July 2013
Welcome to my new sewing blog!
Hello & welcome to my new blog! Eek - really excited to be finally starting it. I've been sewing myself for little over a year now and have crafted many lovely dresses, bags, purses and soft furnishings for the home and thought it would be really cool to start blogging to have a record of my work and to hopefully inspire others to have a go themselves.
I've found sewing to bring a little piece of relaxation and calm to my hectic life and the great thing is that you have something to show for your efforts at the end of each sewing project.
When I started sewing I trawled the internet for help with techniques and tips as well as cost effective and free sewing patterns, lots of hours were spent searching rather than creating - so I hope that my blog will have all the helpful information in one place for those new to the craft.
During my blog, I plan to provide basic guidance for those that are new to sewing, as well as profiling great free patterns that can be found online - for many of which I shall share my attempts at them as well as any tips that I can offer. I also plan to review purchased sewing patterns, so that you can see the end result and I will be featuring my own free sewing projects for you to have a go at yourself!
I look forward to sharing my sewing projects with you!
Subscribe to:
Comments (Atom)


